Will the Tabby Jack work with my loom?
The Tabby Jack has been tested on the following looms:
- Ashford Rigid heddle looms
- Ashford Knitters loom
- Schacht Cricket loom
- Ashford Rigid heddle looms
- Ashford Knitters loom
- Schacht Cricket loom
- Kromski Harp loom
- Schacht Flip loom
- Beka SG rigid heddle looms
But what if your loom isn't on that list?
Well, read on for an easy way to see if the Tabby Jack can be installed on your loom.


- Schacht Flip loom
- Beka SG rigid heddle looms
But what if your loom isn't on that list?
Well, read on for an easy way to see if the Tabby Jack can be installed on your loom.
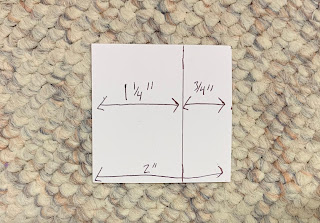
Begin by cutting out a piece of paper 2 inches square. Then draw a line 3/4” in from one edge of the square.

Step One: Place the paper along the frame of your loom behind the heddle block. If the paper fits without hitting anything such as clicker pawls or screws that are not counter sunk you are doing good. If it does not, try a different part of the loom, such as the inside of the frame rather than the outside. Picture 1 below shows a good fit. Picture 2 is a bad fit.

Good fit

Bad fit
Please note that if the paper does not fit because the bottom part is lower than the bottom of your loom, this is okay. It just means the bottom of the Tabby Jack will stick out lower than the bottom of your looms frame. In practical terms, this means you will not be able to use the Tabby Jack when your loom resting flat on a table, but it will work fine propped against a table or on a stand. Below is a perfectly acceptable placement for a Tabby Jack:

Step Two: Here you are going to see if the pegs that secure the Tabby Jack will be level. If the area above where you place the piece of paper is flat, you are doing great nothing more to test here- go to step 3. If the area above where you placed the paper is curved, fold the paper along the line. The corners of the short side (1 1/4”) represent the spacing of the peg holes on the Tabby Jack. If you can get the corners to touch along the curve and the top of the paper is flat- you are good! However, if the top of the paper is angled, the Tabby Jack will not work in that location. Try a different part of your loom’s frame. Picture 1 shows a good fit, Picture 2 shows a bad fit.

Good fit

Bad Fit
Please note that the Ashford Knitters loom has a frame that you rest flat to warp and then angle up when it is time to weave. The Tabby Jack does not need to be adjusted when you angle the back beam, it will work just fine. The important part is that the Tabby Jack be level in relation to the frame of your loom, not to the ground.
Step Three: Next, you need to see if the washer will fit on the opposite side of your loom frame directly across from where you want to place the Tabby Jack. To check this, see if the 3/4” part of the paper can fit on the loom directly behind where you want to place the Tabby Jack without hitting anything. Pictured is a good fit.

Step Four: I lied, there is one more step! You need to see if the Tabby Jack will raise your warp thread high enough to get a good shed. Measure the distance from the top of the frame to the top of your rigid heddle block (make sure you are measuring over a part of the frame that is level with where you will be attaching the Tabby Jack). Then, measure the distance from the bottom of your rigid heddle to the bottom of the eye slots. Add these two measurements together. For the Tabby Jack to have enough space to raise your warp threads, the number you get should be less than or equal to 4.5 inches. In the example below, using an Ashford Rigid Heddle Loom, you can see that the distance from the top of the frame to the up position on the rest block is 2” and the distance from the bottom of the rigid heddle to the bottom of the eyes is 2.25”. Together this adds up to 4.25 inches- Just under 4.5- but enough to work!
**Please note: we are trying to find a work around so that the Tabby Jack will work on Sample It looms. If we do, the video below will be updated, as will information on this post and the main page.


And a video demo showing all of the above for those visual learners among us:
